Networking
John McKerrell, the developer of CamViewer is not affiliated with the manufacturer of any IP webcams. As such I’m not the best person to tell you how to configure the cameras or get them connected to the Internet. I do get a lot of queries from people who are having problems, especially with accessing the camera when away from the home network and over 3G or mobile and cell networks, so I thought I’d put together some hints and tips on this page.
| FOSCAM TECHNICAL SUPPORT WEBSITE | TENVIS TECHNICAL SUPPORT WEBSITE |
Please note, some tenvis.info addresses have been known to have issues. If you see this, simply try connecting for a second time, if this continues to fail then contact Tenvis for support
Testing your camera
Before reporting a problem with the app it is best to try accessing your camera from a web browser. You should do this first from a computer as it will be easier to set things up but after this you can also access it from Safari on your iPhone, iPad or iPod Touch. Your camera will probably come with its own unique address such as testcamera.mytenvis.com, testcamera.myfoscam.org or testcamera.tenvis.info. You may be using an IP address such as 192.168.0.53 or 27.23.151.238 but these may be private network addresses and also are likely to change from time to time so you should use a dynamic DNS service by preference, see below for more information. Your camera will also have a port number, this may be 80 but will often be in the 8 thousands (8000, 8010, 8080, 8888, etc.) or almost any other number. To access your camera from a web browser simply type http:// followed by the address. If you need to enter a port simply put a colon : followed by the number. Some examples:
http://testcamera.mytenvis.comhttp://testcamera.tenvis.infohttp://testcamera.myfoscam.org:8080http://192.168.0.53:80http://27.23.151.238:1000
Connecting your camera to the network
Although CamViewer works with many brands of IP camera, each camera might have a different layout for administration so it’s impossible to provide full instructions for every camera here.
Ethernet
The simplest way to get your camera online is to use an ethernet cable. This simply connects your network router into the back of the camera and should start working straight away. Use the software provided with your camera to identify the camera on the network and access the administration interface. See Useful Settings for some useful settings to use, or continue on to read about wifi.
WiFi
Most people want to access their cameras using WiFi. To do this you will still need to plug your camera in using ethernet and once you can access the administration interface you will use this to enter the WiFi settings then reboot your camera, unplug it from the network and hope for the best!
- Your administration interface should have a menu option labelled Device Management or something similar, select it.
- Next select Wireless Lan Settings, Wireless Settings or something similar.
- Now you need to enter your WiFi settings. Scan or search to find your network or just enter the SSID
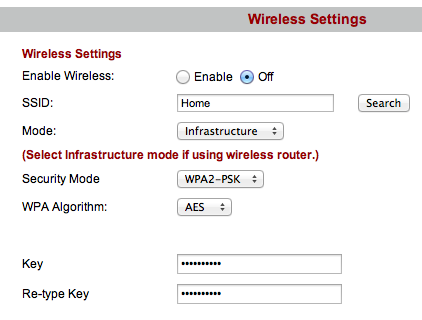 One type of IP camera is known to have a bug on this page and actually requires that you set Enable Wireless to Off before you can fill the form in!
- If you searched or scanned and selected your network, the camera should guess the type of connection and the security that you have on the network. If not, select these yourself. Enter the password if you have one, click Submit, Save, or Apply and the camera should reboot. Note that if you leave the ethernet cable plugged in, the camera may use this instead of the wifi, make sure you unplug it first.
- You may now need to use the software that came with your camera to find it on the network as the WiFi interface will have a different IP address to the ethernet interface.
I have one camera that often doesn’t connect to the WiFi when rebooted and will need to be rebooted 4-5 times before it will connect. Also if you reboot your router or broadband modem you may find that you need to reboot your camera also before it can be accessed.
Carry on to the Useful Settings to see some things you might like to do next.
Useful Settings
Most IP cameras will use port 80 by default, meaning that you connect to them using http\://192.168.1.X/ or http\://192.168.1.X:80/. While this can be simpler as port 80 is the default for HTTP, it can cause problems if you want to make your camera accessible from outside your network. Often when you do use port 80 you will find that cell or mobile networks will intercept your connection with a transparent proxy, which can stop you using the audio feature provided by the cameras; using an alternative port number may stop this. There are times when using port 80 will be better though, for example on very restrictive networks that only allow you to connect across specific ports. If you have multiple cameras and you want to make them all available through the same internet connection you will need to have a different port number for each one.
DHCP
DHCP is the service that the camera will use to get an IP address on the local network. Every time the camera turns on, and then regularly afterwards (this can vary but is usually a number of days), it will check with the router or broadband modem what its IP address should be. Often it will get the same IP address but sometimes this will change.
If you are using a dynamic DNS service and UPnP then you should not need to worry about this. If you are connecting locally to your camera using an IP address beginning 192.168.... or 10... then you may find you have to update the address from time to time. Similarly if you have set up port forwarding on your router manually then you will need to make sure this matches the current local IP address for your camera.
Many routers will allow you to “bind” your camera’s MAC address to a specific IP address to stop it changing each time.
Accessing a camera from outside the local network
Many of the cameras that are available now try to make it as easy as possible to access your camera from outside the local network, they may offer a DDNS (Dynamic DNS) service as part of the package and will include UPnP functionality in the camera.
Please be aware that some routers and broadband modems will not allow you to access the external interface from within the network. What this means is that you may have to use the internal IP address when you are on the local network and the external IP address when you are outside it.
A note on private networks
The internet protocols allow for something called “private networks”. These are networks that use a special selection of IP addresses which are not accessible from the wider internet. These have IP addresses of
10.0.0.0 - 10.255.255.255,172.16.0.0 - 172.31.255.255and192.168.0.0 - 192.168.255.255. IP addresses beginning with169.254...can suggest problems with your camera’s networking. In most circumstances, if your IP camera has an IP address that is contained in one of these ranges, you will only be able to access it when you are on the same network, i.e. not on mobile or cell networks.
If your camera’s IP address is a private network address and you try to access it from a 3G mobile or cell network, it is very likely that you will not be able to connect to it.
To access a camera from an external network you will need to do two things. 1) make sure that your router or broadband modem will pass traffic from the internet to your camera and vice versa. 2) Find out the external IP address of your connection.
Routing traffic from the internet to your camera
The simplest way to do this it to turn on UPnP on your camera:
- Your administration interface should have a menu option labelled Device Management or something similar, select it.
- Next select UPnP Settings or if this is not available it might be under Remote Access
- Enable UPnP here.
- Your camera will probably reboot at this point, once it has finished you should be able to access your camera from outside your local network.
Not all routers and broadband modems support UPnP or have it turned on by default. If you cannot use UPnP you will need to investigate Port Forwarding in the administration settings of your router or modem. You will use this to tell your router to take any traffic that turns up from the internet on a specific port and pass it to either the same or a different port on an internal IP address.
Each router and modem is different so I can’t give in depth instructions on doing that here. Look on your router for a sticker that gives a username and password. You will probably find your router’s admin interface at one of the following addresses:
Your IP Address
You can find out your IP address through a number of services, in fact if you simply search for “ip address” on Google, it should show up at the top next to “Your public IP address is”. You may also like to use http://www.whatismyip.com or http://whatismyipaddress.com.
Please note, some tenvis.info addresses have been known to have issues. If you see this, simply try connecting for a second time, if this continues to fail then contact Tenvis for support
Most home internet connections will have an IP address that changes from time to time, this can be very often, e.g. daily, or many months apart. You may even find that it stays stable for a long period and then suddenly starts changing regularly. The best way to deal with this is to use a Dynamic DNS service. Many camera manufacturers now offer a DDNS service or recommend one, if not then have a look in your camera’s interface to see what options it supports. Select DDNS Service Settings or Remote Access from your camera’s Device Management area and investigate the options it gives you there. Some DDNS services require that you reactivate your account each month so if the app stops connecting to the camera, you may want to check that your DDNS account is still active.
Further Help
If you are still having problems accessing your camera then see the Getting Help page. As networking can be such a complicated subject though it’s unlikely I will be able to provide much more information than what you see above.